Create a canvas size you can work with and that matches the size of your elements. Mine is 800x800, since my elements are tagger sized. (Mine is cropped close for better viewing.)
Open an element from the kit you are using and: Edit > Select All > Edit > Copy and then add to the canvas. Then, go to the canvas and: Edit > Paste into New Layer to add the element to the design.
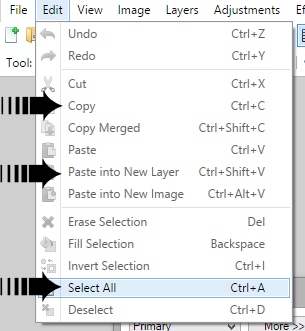
You'll see addition lines (also called "frames") around the new layer. Simply Edit > Deselect and they'll be gone.
Now you can move the element either by (1) manually moving into position or (2) using object align to position to your liking.
After every layer added, always remove the frames before any movement with Object Align OR Drop Shadow. This ensures all of the element is moved OR that the drop shadow is even and not cut off.
At this point, name your design and save as a .psd extension then continue until the design is completed.
Here's what I came up with:
I check the white background of my design to remove it (for a clear background that works with all colour backgrounds) and then Image > Flatten to merge it into one layer. Then, save the design in .PNG to ensure a sharper image for viewing.
When using tubes, ALWAYS credit the designer who created the tube, with a current URL, when crediting the designer.
Way #2:
If the elements you are using are smaller than the canvas you've created, you can simply add them by doing the following:
At this time, a box will pop up. Use it to find the kit/elements you wish to add to the canvas and click open.
Once added, deselect the addition frames and position. I've added two elements (from above) and positioned them after removing the addition frames.
I then cropped and came up with this:
This is how I made th same screen shot look like one!


No comments:
Post a Comment