-->
How To Add PDN Layers HERE. I do it the first way every time. PDN/PSP Plugins that I use a lot are located HERE.
Showing posts with label Paint.Net Instruction. Show all posts

Sunday, April 21, 2024

How to Resize a Page Template into a Tagger Template

 Hi Bloggers,

I've been asked by some who request from me just how I use a Page Template as a Tagger's Template so I'm going to show you how I transform a page into a useful tagger template, which opens up a wider range of resources for me.

Today, I am using a page template by Elizabeth Minkus, which you can find HERE. Although I am a member, you do not have to be a member to download this template.

Download the template, and then do the following.

Highlight the Photo Guide Layer in your Layers box and: Edit > Select All > Copy > Paste Into a New Image.

Do the same for the scattered hearts layer.

Once you have these two into new images, delete the other layers EXCEPT what is shown below.

Now, resize the whole template to 900 widths (height will follow).

Go to the new image of the scattered hearts and do the following: Edit > Select All > Copy > Go to the white background layer in your layers box for the template > Paste as a new layer.

Yes, this box will pop up:

Simply click "Keep Canvas Size" and it will add the layer. The new scattered hearts layer will be off by a huge margin but don't fret! Simply move the layer into position. I did this because the right side of the original scatter hearts layer is cut off, so I lined that right side up with the right side of the white background to even it out.

You now have something that looks like this:

Once I've added my scattered hearts layer, I delete the copy that I made, since I no longer need it.

Next, I do the same thing for the photo guide layer, following the very same steps that I've shown above. Now, you have something that looks like this:

With my "new" tagger's template, I can create a design to my liking. I'll be using a blog train portion from The Lily Pad's current April train, by Becca Bonneville HERE.

This was my final edit. As you can see, I didn't use the scattered hearts layer after all with this kit, but it can be used with a lighter, more romantic kit. 

The Photo Guide layer helped me to realize where I wanted to place my frame before adding any elements and with the frame paper.

I could have also merged all of them template layers and used a photo mask to create a different style of background for this tutorial as well. This, to me, gives it a much lighter and airy look but does take away from the brilliance of the kit colours.

Hopefully, this helped someone out there who may be struggling to find really good tagger's templates and just simply can't find what they are looing for. There are some excellent page template creators out there, so keep on the lookout for them, and keep your mind open to the possibilities.

Friday, August 4, 2023

How to resize a layer

Hello Fellow Painters! I'm here to show you how to change a size on a layer when working in Paint.Net. It takes a few extra steps but can be worth it, if you want a layer bigger than what is already there, such as in a template.

This is a template that I am going to use in the accompanying tutorial.

I like the template but I would like the filmstrip to be up higher than what it is so I am going to move it and enlarge it.

The first thing that I do is duplicate the black layer, flip, and then move into position so that it now looks like this:


Since I have decided already that I want to add elements above the filmstrip layer, I don't see the need to duplicate and fix other layers of the template.

To enlarge the filmstrip layer, do the following:

Highlight the filmstrip layer in your layers box.

Go to Edit > Select All > COPY > Paste into a new IMAGE. Your new image will look like this:

While on the new image, go to Image > Resize > and then type in your parameters:

This will resize the new layer you just created to the size set in the tutorial.

To place it BACK into the design, simply: Edit > Select All > Copy > and then Paste into a new layer on the template, over all layers.

I used both the filmstrip layer and then gradient layer for this process and add them both over all layers. I then moved them into the position that I wanted and saved.

Thursday, September 27, 2018

HOW TO: Easily Install Fonts

I am a HUGE DaFont fan so, for this instruction, I found this lovely font that I wanted to use in a challenge.
Download the font and then unzip the folder. Inside should be the font and other related materials, which are optional to the author (such as a banner or copyright information).
Left click the font and this will come up:
Click the install button featured at the top of the window and it will install all on its own.

To check, simply open your program and find the font in your Paint.net.

Wednesday, August 23, 2017

HOW TO: Colour an Image With Paint.Net

Recently, I was asked how to use Paint.Net to colour images, such as colouring pages and digi-stamps. While the addition of certain plugins will give the image many different looks, such as adding a glass look or a textured look to your finished design, the colouring part is relatively easy!

Below is an image of a colouring page that I downloaded from the internet. With a digi-stamp, you would purchase these from a store.


Once you upload your image to PDN, decide what colours you are going to use in order to colour your page, or use the colour wheel if you want more primary colours. I've decided that I want to go with the colour palette below.


The very first thing you want to do is utilize your magic wand to rid yourself of any excess white in the areas which you want to colour. If you do not know how to use your magic wand, try this tutorial HERE.

Depending on your design, it may take longer (as with a colouring page) or you may not have to do this step (digi-stamps). Either way, you should have an image that looks like this:


The black and white checkered background is there to prove you no longer have any colour attached to that area and that area is now prepped for your chosen colours.

Add your chosen colour to each area where you want them to be. To do this, use your colour picker to select the desired colour from your palette then use the paint bucket to "dump" the colour into the area. You'll do this for each area you have.

Now I have something that looks like this:


You can leave it as is, erase the excess white from the design and use it to decorate your page.

However, if you want to add texture or other features, like glass or bevel, there are additional steps to take and they are so easy to do.

Duplicate your design. Take your magic wand and click the area you want to use a plugin on (mine is the peace symbol itself).

Use your magic wand to click inside of the image, then go to Edit > Invert Selection > then hit delete on your computer.


Once you complete the chosen area, merge all of your layers together and apply your chosen plugin. (I am showing you the part I used Penta Jeans on and the part I did not above) Do this until you have your design complete!

Please know that, depending on your design, adding plugins can take time since we are constantly duplicating and deleting.

Here's my final design:

Saturday, December 12, 2015

HOW TO: Remove A Pre-Made Shadow

Sometimes, in kits, you get elements that already come with a drop shadow but not the style of drop shadow you may want. There is an easy way to rid yourself of this shadow and it normally doesn't harm the element -- the use of the magic wand!

This is a pre-shadowed element in a kit by Lalie Designs at Digi-Crea.

As you can see, there is quite a bit of drop shadow at the bottom of the element but I want to rid myself of this.

Grab your magic wand and click on the highlighted shadow at the bottom of the element. Your image now may look like this:

Hit delete on the keyboard and it now looks like this:
And now you can add your own drop shadow to the element!

Monday, June 16, 2014

HOW TO: Use Eye Candy Xenofex Constellation

This tutorial will demonstrate that you can use another luscious Eye Candy plugins with Paint.Net. It’s called “Constellation” and it is a beauty! To get this now, you need to purchase Eye Candy 7 (I have Xenofex myself and refuse to update) or, if you are a Xenofex user, can update for a lower price.

First, create the design you wish to use for this tutorial. This is mine below:
Not bad for a quickie tut. LOL I’ve also cropped as close as I could to the mask layer so that I may get a better size when I must resize my design.

Now, while in Paint.Net, I duplicated the hearts layer, since this is what I will be adding the Constellation effect to, so I have three different layers in my layers box.
I have the fourth, and original, layer still there and this is the one I use DS on.

Next, choose which way you want to start in the hearts layers. I always go from bottom to top so I will be going from Hearts Layer 1 to Hearts Layer 3.

Go to Effects > 8bf Filter > Eye Candy Xenofex > Constellation > Run Filter > Use the settings below (choose bling bling under settings) > Ok. This will run the settings on the layer chosen and then click ok.
On each hearts layer, go back to Xenofex and just simply hit random seed once for each layer (twice if you choose).

For this one, re-size now in Paint.Net then add your chosen name and copyright. You will not need to do as I did in the Jiggle tutorial because this one is already saved as it would be used in PDN.

Add each layer in the order you created them in when adding to AS3. Remember, if you worked from Heart Layer 3 to 1, the frames will go BEFORE each other and, if you went from Heart 1 to 3, they will go after each other.

While on the first frame layer in AS3, Edit > Select All > Animation > Frame Properties > 30 > OK. Then, apply the optimization settings, upload to a photo sharing site to enjoy!

Here's mine.


I created the bling large so you can really get a good view of it. There are a lot of slider or boxes that you can use to create smaller, less twinkly glitter but that choice is yours. Play around with the settings (including those preset settings under the settings tab) to come up with your own, unique glitter!

Sunday, June 15, 2014

HOW TO: Use Jiggle for Waving Wings/Hair or Blowing Grass

Today I am going to show you how to use Eye Candy 4000 to make wings wave in the wind! You can use this for about any design you create that you want the look of wind blowing through the design.

There is one difference between Corel PSP and Paint.Net, insomuch as that I have not (at this point) figured out how to do anything like freehand and then elevating that into its' own layer. However, this can still be done!

This is going to be my design for this tutorial.  I am using a tube that has its' back turned outward since I want this to be easy to understand.
Duplicate the tube layer and then hide the lower tube. Then, use an eraser to rid yourself of the body, leaving only the wings (as shown below):
I then DS both my body to my liking and then duplicate the wing layer two more times. These you'll need for the jiggle effect.

Hide the upper or lower two wings (depending on which way you want to set the jiggle) and then Effects > 8bf filter > Eye Candy 4000 > Jiggle > Use the settings below > Run.
Don't pay attention to my random seed! I simply clicked it twice to get what I want. On each wing layer, you need to do the same thing to get the feel of movement.

Open AS3 and add the design into the program, after hiding each layer of wings in the order you've created them, by Edit > Select All > Edit > Copy Merged. If you created your wing layers from wings 3 to wings 1, be sure to place them BEFORE each other in AS3 and AFTER if you went from from wings 1 to wings 3.

While in AS3, and on the first frame layer: Edit > Select All > Animation > Frame Properties > 20 > OK. This will slow down the wing motion a bit. Right click anywhere on the design to bring a box up and scan down to "View Animation". Now you can see what it will look like. Remember this step when re-adding later on.

One at a time, copy each frame layer to add back into PDN to save. Remember, the first frame from AS3 will be used as a new image in PDN and then the other two frames as new layers to the first one. Save as a *psd.
I always save my original, just in case I lose the second saved design so you save it if you like or simply delete it later. Saving the animated ensures that you can use it over and over again at later points in time without having to redo the whole design and animation.

Now back in PDN, re-size and then add the chosen name and copyright to the design. Then, add the design back into AS3 in the same order you did before. Add the same frame properties as I showed you above and then add the optimization settings that, if you followed my tutorial on it before now, will automatically be saved in AS3, so just add them now.

Make sure to view the animation to make sure all is correct. Then, upload to a photo sharing site to enjoy! Below is my example now:


NOTE: If you want to blend the wings slightly better into the tube's back, use an eraser on a low hardness to "blur" the tip nearest to the body.

HOW TO: Written Name Tutorial

(Many thanks to my friend, Sherena, who originally created this tutorial) 

NOTE: You will also need Animation Shop for this tutorial.

Open your program and create any size canvas (your choice). I'm using a simple 400x400 for my quick demonstration.

Add a new layer to your canvas and write your chosen name.
Once there, duplicate the layer so that you have TWO name layers. Hide your first layer for later. This is so you have a name to duplicate from.
Next, grab your eraser tool and start erasing the second name layer, as if you were writing your name by hand:
Save this first stop as 1.gif. In this way, you'll know what order to add them in when we go to Animation Shop.

Undo your work (to unflatten), duplicate your full name, move UNDER your last stop, erase a little less than before on your first stop and then repeat the save.

Open Animation Shop and, from the "file" drop down menu select "Animation Wizard".
Hit Next > Next > Next for the next three boxes that pop up. When the fourth box pops up, enter the numbers below:
Your next box will ask for your images. Go to where you saved them and select them all. It will automatically place them in order.
Click next and it will build your animation.

Upload to your Photobucket or Fotki and then add to your widgets!

Here's mine:

HOW TO: Add Optimization Settings to AS3

 Your First Design! 


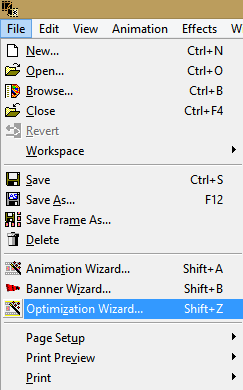
Open Animation Shop 3 and add your design. Once all layers are added (and animation inserted), go to File and scan down to Optimization Wizard. (As seen below)
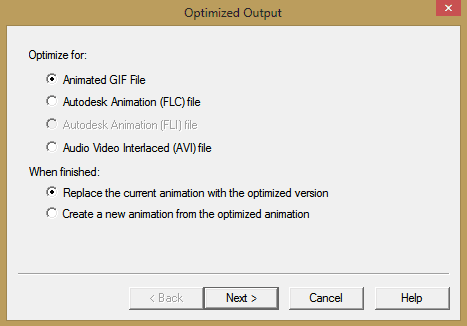
The next box will pop up. Make sure both top entries are checked in each section and hit next (below).
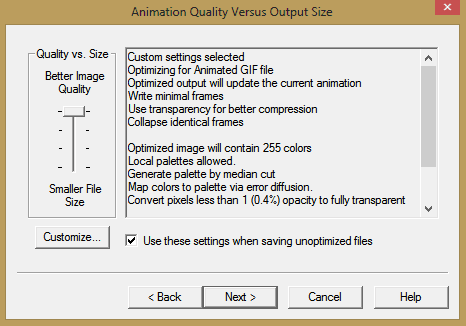
This next bow pops up (below). Make sure your box looks like this and then click "Customize".
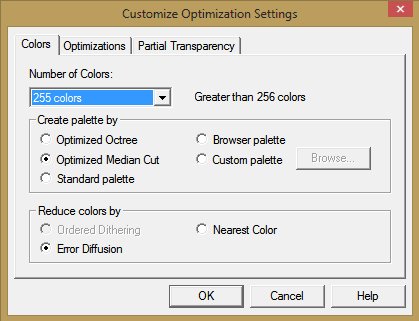
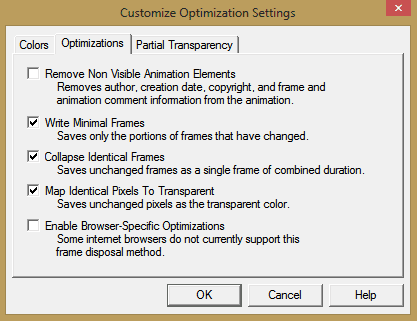
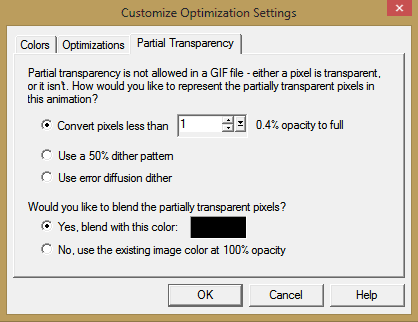
This box will pop up. Add all the settings you see in the appropriate places for each of the boxes shown below and hit ok.
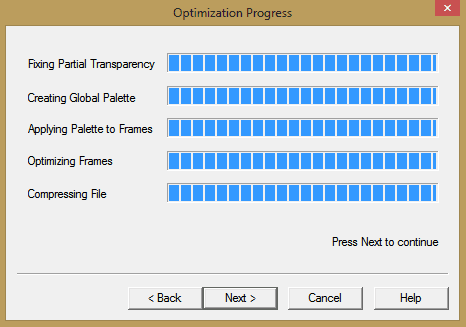
Now, this box shows that your Optimization settings are being applied to your design before animation. Hit next.
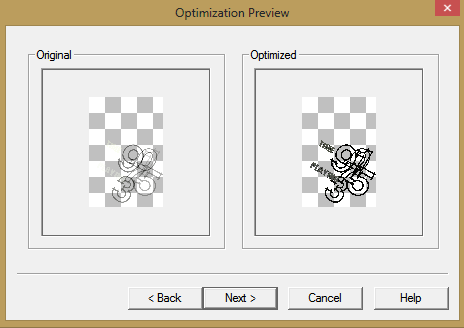
The box below (while not animated here) will show you what your animation will look like once the settings are applied. Hit next.
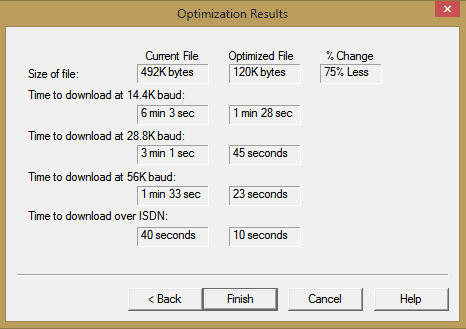
The box below shows all of your stats. I normally don’t worry about this and just hit finish. Now your optimization settings are added to your design.
Just save your newly animated design under your chosen file name, upload to a photo sharing site to enjoy!


 Subsequent Designs! 


When you design your next design to animate, there will be no need to go through all that you went through for the very first design that you created above.

Simply click on your first frame and then hold shift +z to add the already saved optimization settings to your next design.