

♥ Supplies Used ♥
Rosalie by TataLin Designs, HERE
“Watermelon” by Joshua Brooks, here
Eye Candy Impact: Glass (for name)
♥ Let's Begin! ♥
Create a canvas 900x900. We’ll resize later. Name and save as a *psd.
Open a purple/pink paper of your choice, upsize to 850 width and apply your mask. Hold until instructed.
Open element 59, add to your canvas then Object align to center both.
Open element 72, mirror and flip then upsize by 145%. Add this above your frame layer and pull to center it.
Open your choice of tube, don’t resize, add above all layers, and then center to your liking. Don’t worry about her legs just yet.
Open your paper of choice, add below your frame layer and erase the excess.
Open element 34, resize by 65% and add above your tube layer. Once you like the way it’s positioned, erase the tubes legs.
Open element 43 and add above your last layer. Center it then duplicate and erase the right hand side. Mirror this and move them to touching then merge the layers together.
Open element 60, flip and then add above your frame layer. Undo it all on the original then resize by 75%. Add this above your element 34 layer.
Duplicate both layers of element 60 and merge the like with the duplicate. (Meaning, don’t merge the larger size with the smaller ones)
Open element 48, resize by 80% and add above your tube layer. You can tuck this in on the left or right side of your design.
Open element 52 and add above your larger element 60 layer. Tuck this in on either side.
Open element 51, rotate clockwise and add above your element 72 layer. Pull it downward so that you can see it.
Open element 49 and add above your element 51 layer. Find a nook in which to place it so that it shows. Duplicate, mirror and flip then pull downward on the opposite side to show the little peas as well.
Open element 38, resize by 50% and add this above your element 43 layer. Move this into the crook of your ribbon layer on the right.
Open element 53 and erase the leaf part carefully. Mirror and then add above all of your layers. Move it into position near the element 38 layer.
Open element 2 and add above your element 72 layer to the left. Duplicate, mirror and then pull to the left and downward, so that it is lower than the other. Merge the two layers.
Apply your mask now above your white background. Slowly pull upward until it is positioned, then duplicate, flip and merge the two layers together.
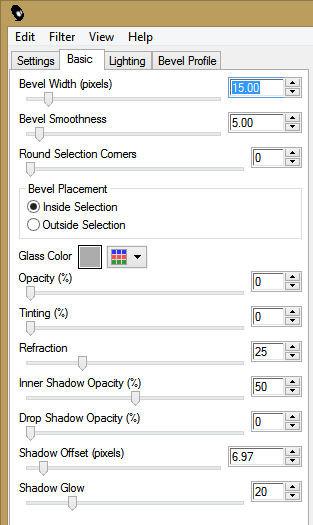
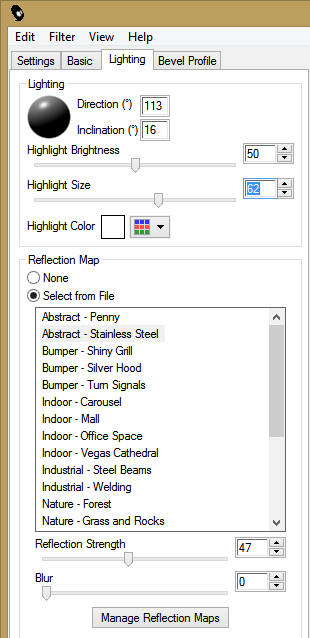
Add a new layer above all layers to add your name. I used the settings in Eye Candy below on button bevel and this colour for the text: 7F0037.
Drop Shadow layers, crop or resize to your liking then add your name with copyright. Upload to a photo sharing site to enjoy.
No comments:
Post a Comment