

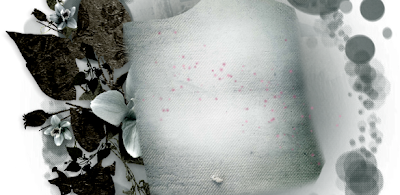
Tube by Zindy Nielsen, HERE
“Champignon” (name) Colour: FF00DC
Eye Candy 4000 Impact Bevel
“Intuition” by Studio Lalie Designs (HERE)
Mask 41 (Set 6) by Brutal (HERE)
Animations 32 by Simone (HERE)
Animation Shop 3
♥ Let's Begin! ♥
Create a canvas 900x900; Upsize your mask to 800x800. Open your paper of choice, resize by 25% and apply your mask. Copy and add to your canvas, then centre manually – erase any extra mask. Name and save as a *psd.
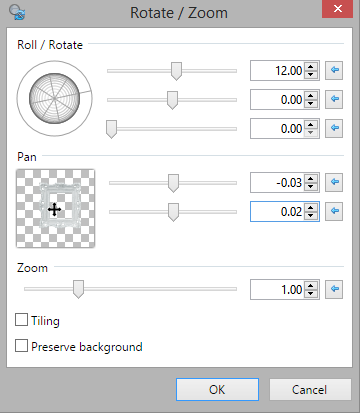
Open element (51), resize by 21% and add above the mask layer; flip white background. Layers > Rotate/Zoom with these settings:
Open paper (2), resize by 20%. Add below your frame layer; Erase excess.
Open the tube, resize by 112% and add above the frame layer; position to the right.
Open element (2), flip, resize by 25% and add above all layers.
Open element (7), resize by 45% and add above the tube layer to position.
Open element (42), resize by 25% and add above the frame layer to position.
Open element (16), resize by 20% and then add above the flower layer. Go back to the feather, mirror and then resize again by 80%. Place this one under the pink rose (left).
Open element (31), rotate to standing and resize by 45%, add below the clock layer and add above the mask layer to position.
Open element (44), erase the outer parts of the element, crop and then resize by 40%, mirror and then add above all layers to position.
Open element (48), resize by 30% and then again by 90%. Add this below your pink rose (left) layer and position.
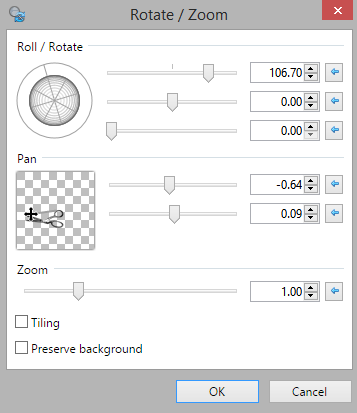
Open element (33), resize by 25% and add above the element 7 layer then use the rotation settings below to position. You may have to tweak yours.
Re-Position to your liking; Drop Shadow layers, crop or resize to your liking then add your name with copyright. Upload to a photo sharing site to enjoy.
Want the animated version? Follow the instructions below instead!
♥ Lets’ Animate! ♥
Resize design to 606x595. Open animation shop and then open both animations.
In Animation 32, delete all frames after frame 28; edit > select all > Animation > resize > percentage of original > 55 > Animation > rotate > right > free > 20.
Hide all of your layers in your design, with the exception of the last four layers.
Edit > Select All > copy merged and add as a new animation to AS3. Duplicate until you have 28 frames.
Return to Animation 32; while on first frame: edit > select all > copy. Return to your design and edit > select all > Paste > insert selected frame. This will add the animation to your design.
(See below for placement of this animation on your design)
Now the difficult part comes! Copy each frame back into PDN one at a time as a new layer in a new image. Stay in order!
NOTE: When you make a new image, name “Intuition Animated” and save as a *PSD. You MUST save it or you could crash and lose everything! Save after every TWO frames, if needed. But take your time. While most would want this done lightening quick, it is best to tread lightly than to make a mistake with 28 frames and have to start over.
Go to your static design and hide all the layers above the frame paper.
Add all the layers--from the frame to the last rose (left)—to your design one at a time. Remain in order and rename after every addition. It is best to save after every two layers.
Close your static design (without saving) after additions to animated design are completed.
Hide each animated layer in PDN (save the first frame) and add one after the other to AS3.
After you add your frames, apply your optimization settings and save. Upload to a photo sharing site to enjoy.
No comments:
Post a Comment