

Steampunk Girl (HERE)
“World Geography” by Snips and Snails (HERE)
“Madison” (Name)
Eye Candy Bevel
Animation Shop 3
♥ Let's Begin! ♥
Create a canvas 1200 x 1200. Open frame; re-size by 50% and add to canvas. Remove addition lines and center align.
Open ppr 1; re-size by 20% and add below frame; remove excess.
Open the flair; re-size by 75% and add above the frame layer.
Open flower 2; re-size by 35% and add one above and one below the flair.
Undo re-size and re-size again by 45%; add this above the flair, between the other two flower layers.
Open flower 1; re-size by 30% and add on either side of the smaller flower 2 layers.
Open the leaf; re-size by 30% and add below the upper flower; add another to the opposite side.
Undo re-size, re-size again by 40% and then add below the flower 1 layers.
Open the string; re-size by 35% and add above the leaf layer. Use a light erase to remove left-hand tail.
Open the ruler; rotate to standing, re-size by 40% and add above the frame layer (see placement below).

Use the rotation below on the ruler and then erase the bottom, duplicate, flip, mirror and align before merging. Tweak by pulling the left edge to the right edge of the frame.

Open the pencil; re-size by 63% and add above the ruler; position.
Open the berries; re-size by 65% and add one on each side of the pencil and ruler. Go back to the original image, rotate to laying and add one at the bottom of your design.
Now, DS all layers except the flair. Crop as close as you can to the drop shadow you added, but leave a bit more space at the top of your crop.
Pick the close-up tube, image > flatten and then add above the frame to the position. Be mindful of her feathers.
Move this tube below the frame, duplicate and then move above the string layer. DS this layer and erase excess at the bottom.
Open flower 2 again; re-size by 45% and add above the tube layer but under the flower 2 layer. This will hide the empty space once we animate.
Re-size and add the chosen name and copyright information. If you want static, stop here. Animation instructions are below.
♥ Lets’ Begin! ♥
Go back to the flair and create 3 separate layers and name them in order (1, 2, 3), but not counting the original layer (mirror to DS layer and then keep for original flair layer 1).
On Flair 2, use the rotation seen below and then mirror before DS. Pay attention to all the buttons I used.
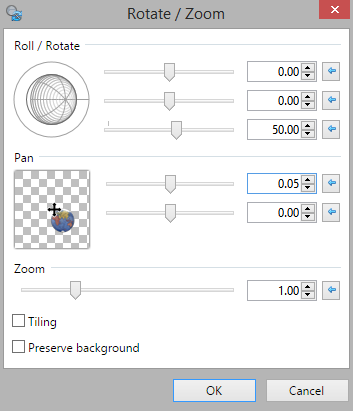

NOTE: Lining up is quite easy to do (see below) and is only necessary because PDN will NOT negative rotate. However, keep flair layer 4 (the duplicated layer) where it is. Do not move it from below the Flair 3 layer.

No comments:
Post a Comment