Steampunk 85 by Very Many (HERE)
"Lovely Rainbow" by Lizzy Hart (HERE)
Mask 288 by Mizteeques (HERE)
“Slimlight” (NAME)
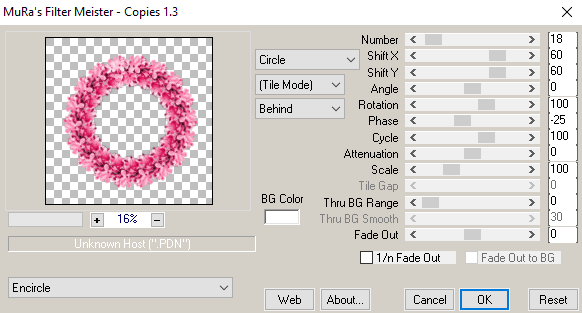
Mura Copies
Create a canvas 1000 x 1000; we'll resize later.
Add DBD_Lovely Rainbow_Frame5 to the canvas and center align.
Open DBD_Lovely Rainbow_Paper(13), resize to 760 widths and replace the frame opening.
Open DBD_Lovely Rainbow_Element (116), resize by 50% and add above all layer. Drop shadow now and use the copies settings below.
Open DBD_Lovely Rainbow_Element (109), resize by 50% and do the same as above. Use the settings below.
Add DBD_Lovely Rainbow_Element (109) above the frame layer as well.
Open DBD_Lovely Rainbow_Element (104), resize by 30% and work the same as above. Use the settings below.
Add DBD_Lovely Rainbow_Element (104) above the frame layer as well.
Open DBD_Lovely Rainbow_Element (10), resize to 750 widths and add to the canvas; center align and move above the element 116 layer.
Open the tube, resize by 75% and add above the frame layer.
Open DBD_Lovely Rainbow_Element (113), resize by 60% and add above the tube layer.
Open DBD_Lovely Rainbow_Element (30) and add above the tube layer.
Open DBD_Lovely Rainbow_Element (67), resize by 70% and add above the element 30 layer.
Open DBD_Lovely Rainbow_Element (74), resize by 30% and add above the leaves layer.
Open DBD_Lovely Rainbow_Element (115), mirror, resize by 50% and add above the arrow layer.
Open DBD_Lovely Rainbow_Element (96), resize by 45% and add above the arrow layer.
Open DBD_Lovely Rainbow_Element (52), resize by 70% and add above the frame layer.
Use DBD_Lovely Rainbow_Paper (2) with your mask.
Open DBD_Lovely Rainbow_Element (63), resize by 70% and add above all layers; manually rotate.
Crop as close as you can to the design, resize (if needed), before adding your name and copyright; upload to enjoy.


No comments:
Post a Comment