♥ Supplies
Used ♥
Font called “Champignon,” (here)
Two Grass overlay by The Artist; which can be found HERE and HERE.
Cloud background by Rin Shiba, which can be found HERE.
Pine Tree by Moonglowlily, which can be located HERE.
Two Grass layer by gd08, which can be found HERE and HERE.
Birds by Selunia, which can be found HERE.
Eye Candy Gradient Glow
DSB Flux Bright Noise
Animations Shop 3
♥ Lets’
Begin! ♥
Open your background (with trees) and mirror. Resize your
second 2220 x 1388. Add this above your first grass layer and then crop until
both bottoms are even.
Save your design now as a *psd called “Here Comes the Sun.”
Open your background and crop out the right side. Resize
by 2220 and then add below your grass layers.
Open the tree and resize by 45%. Add above all layers and
mirror. Then drop with 9-6-20-15.00.
Open grass 1 and then resize by 25%. Add this below your
tree layer and then position between the two hills. Move below hills 1 layer.
Open grass 2, resize by 15%. Drop with 1-1-35-3.00.
Duplicate, mirror and place this wherever you’d like. Merge these two layers
together.
Add another grass 2 layer, resize by 15% and then again
by 90%. Move this closer to the top of the hill.
Open your birds and add below your tree layer. Hide tree
layer for now. Use an eraser to remove every other bird, starting at the left
side of the image.
Duplicate and then pull toward the right, using the last
single bird to cover the last double birds of right. Then erase the double
birds of the first layer and then remaining birds of the duplicate layer. Merge
both together.
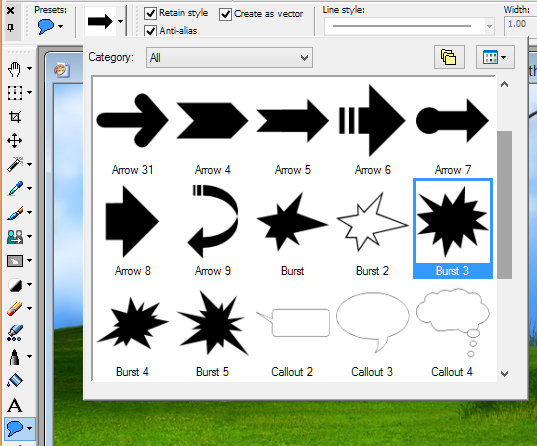
Over all layers, go to your preset tool and find preset shape. From the drop down menu, find burst 3, create a burst and then convert to raster layer.
Over all layers, go to your preset tool and find preset shape. From the drop down menu, find burst 3, create a burst and then convert to raster layer.

Move your sun to the middle of your canvas and Adjust
> Blur > Radial Blur and use the settings below.
Add a dub flux of 25 mixed to your sun and then drop by 9-13-15-43.00.
Move the sun, as seen below:
Duplicate and then move again, as seen below. Do this with however much space between suns you want—a lot or a little, depending on how many animated layers you want.
Do this until your sun is going from one end of your sky to the other. I have 6 layers. Drop each layer to 75% opacity.
Resize
now. Add a new layer above all others and Select all > Select selections
borders > 7 > flood fill white > select none. Outline and then drop
shadow 5-3-25-13.00. Duplicate, mirror, flip and then merge together.
Add
your name now. I dropped 5-3-54-9.00.
♥ Lets’ Animate!
♥
In PSP, add each layer—one after the other—until all of
your sun layers are there.
Return to frame 1 and Edit > Select All > Animation
> Frame Properties > 20.
Apply your optimization settings, save and upload to photobucket. Enjoy!


No comments:
Post a Comment