Lady Pumpkin (HD) by Ismael Rac, HERE
“Waterbrush”, Rob Leuschke, here
“A Little Goes a Long Way” by Sam’s Scraps, here
Mask: “132” by Aqua, HERE
Eye Candy: Impact: Bevel (for name)
♥ Let's Begin! ♥
Open paper 8 and apply your mask. Erase all of the excess around your mask.
Add a new layer above your mask layer, flood-fill white and send to the bottom. Name and save as a *psd.
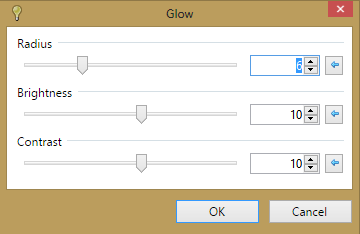
Open the frame, resize by 52% and add above your mask layer. Flip the layer and then center align. Apply normal PDN glow settings (shown below, just in case).

Open paper 5 and add above your frame layer. Magic Wand > Click inside frame opening > Edit > Invert Selection > highlight paper > hit delete > move below tree 1 (lower tree under frame) > name frame ppr.
Open ribbon with flower, resize by 70% and add above your frame layer.
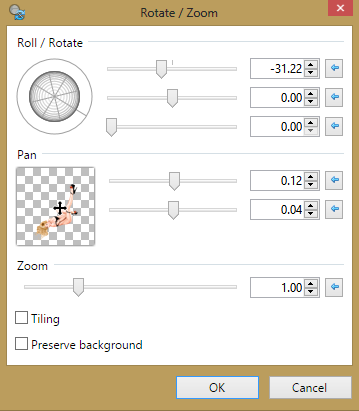
Open your laying tube and add above your ribbon layer. Use the rotation settings below to position. If you are not using the same tube, please play with your settings to achieve the same effect.

Duplicate leaves layer, flip and mirror then position on the other side of tube. Merge both layer together.
Open flower 2, resize by 50% and add above your ribbon layer; position as shown in tag above. Add another near her leg.
Open flower 3, resize by 35% and add above your leaf layer. Pull to the bottom near tube’s head to position. Add another near her foot.
Open the butterfly, resize by 45% and add to the upper right of your tree.
NOTE: I used my nubs on my mask layer with my move tool to pull slowly at the lower right and upper left hand corners to expand my mask a bit. There was no need to center it when completed.
Drop Shadow layers, crop or resize to your liking then add your name with copyright. Upload to a photo sharing site to enjoy.


No comments:
Post a Comment