

“Happy Halloween Chick” by Elias Chatzoudis, HERE
“Yankee Ghosts BB” by Blambot, here
“Fright Night” by BLT Designz, here
Vix’s Halloween Mask 3, HERE
Eye Candy Nature : Bubbling Cauldron
Eye Candy Impact: Bevel (for name)
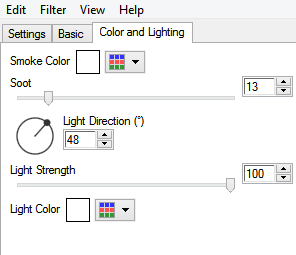
♥ Where There’s Smoke! ♥
To create the smoke:
Opened Eye Candy: Nature: Smoke: Bubbling Cauldron
Use the settings below after adding a layer above the frame layer. This will fill the bottom half of the added layer.
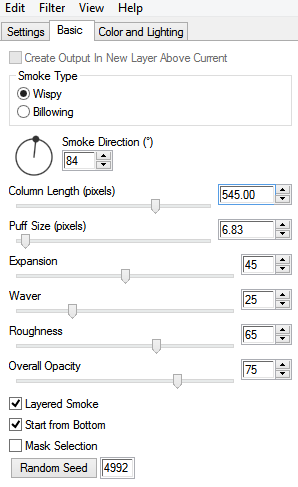
Using your move tool, grab the bottom right hand nub of you smoke layer and push toward the center, until you reach your desired size. Then pull toward the end of the frame (once added).
Use your eraser on 30% hardness to soften the bottom (and side) of your smoke.
♥ Let's Begin! ♥
Create a canvas of 750x750. Name your design and save in *psd.
Open paper 1, resize by 20% and apply your mask. Erase the excess at the bottom and then add to your canvas. Grab the left nub and pull slightly to the left. Duplicate, mirror, flip and then merge the two layers together. Duplicate again and mirror only then merge together. Lower opacity to 175.
(Note: I pushed my mask toward the center slightly to get it tighter to the frame once it was added.)
Open frame 3, rotate clockwise, resize by 27% then add to your canvas.
Open paper 4, resize by 15 then add it above your frame layer and center.
Grab your magic wand, click inside frame opening and: Edit > Invert Selection > Hit delete on paper layer and move below the frame.
Open the web, resize by 25% and add above your frame paper layer. Drop shadow, grab your magic wand, click the frame paper layer and then highlight the web and hit delete.
Add your smoke layer now.
Open the moon and resize by 25%. Add above your mask layer and pull toward the right hand corner.
Open the crystal ball and resize first by 10% and then by 80%. Add above your smoke layer, to the left.
Open the hat, resize first by 15% and then by 55%. Add near your crystal ball.
Open flower 1, resize by 10% and then by 60%. Add below your hat layer then pull into position.
Open the spider, resize by 7% and add above your hat layer.
Open the ladder, resize by 40% and add above your smoke layer to the left. Make sure it touches the moon behind it.
Open the owl, resize by 13%. Sit him on the ladder on any rung of your choosing.
Open the tube and add above the frame layer. Try to get your pumpkin closer to the upper left hand corner for centering. We’ll come back to her later. Send to the bottom and move to below your web layer.
Duplicate and then send to the top. Drop shadow this layer before using your eraser to remove the bottom of the tube.
You’ll notice some web sticking out. If you do, simply erase a bit of it so that she looks to be standing in the web.
Drop shadow all layers and resize to your liking. Add your name, copyright and upload to enjoy!
No comments:
Post a Comment