

“Honey”, by Elias Chatzoudis, HERE
“Alex Brush” here.
“Bee Mine” by Crafted by Gina, here.
“Mask 41” by Chas, HERE.
Word Art HERE.
♥ Let's Begin! ♥
Open paper 5, apply your mask then duplicate, flip, mirror and merge your layers. Add a new layer, flood-fill white and send to the bottom. Name and save as a *psd.
Flip white background and center your mask: Effects > Object > Object Align > Center both > OK
Open window, resize by 80%, add to your canvas, flip white background and then centre.
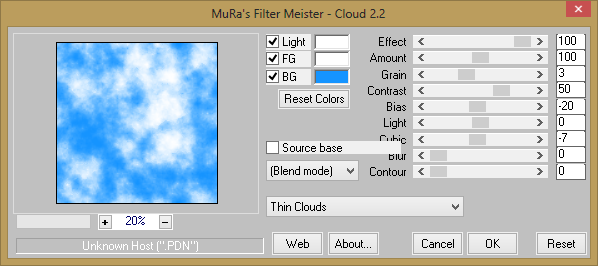
Add a layer above your frame and apply the Mura Meister’s Clouds setting below.
Open the honeycomb and add above your mask layer. Pull upwards and to the left then duplicate. Flip and mirror to position at the bottom then merge both layers together.
Open the pump, mirror, resize by 80% and add above your frame paper layer then position to your liking.
Add your tube layer above all layers and position.
Open honey 1, resize by 65% and add above all layers then position.
Open flower 7, resize by 75% and add above your frame layer. Undo your resize, do it again by 45% and then add above your honey pot layer.
Open leaf 1, flip and mirror, then resize by 65%. Add above your frame layer and position.
Drop Shadow all layers, crop or resize to your liking, add your name with copyright then upload to a photo sharing site to enjoy.
No comments:
Post a Comment