

Tube by Jose Cano, HERE
“Brotherhood” (name) Colour: A70A05
Mask 106 by Vaybs (HERE)
♥ Let's Begin! ♥
Create a canvas 900x900; Upsize your mask to 800x800. Open your paper of choice and apply your mask. Copy and add to your canvas, then centre manually. Duplicate, merge then duplicate and merge again. Name and save as a *psd.
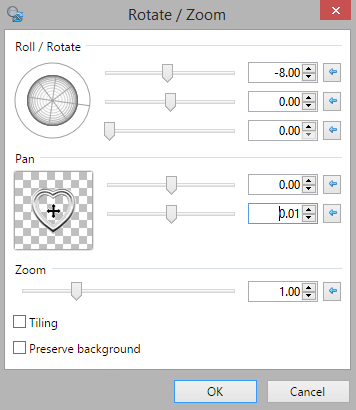
Open Collab_VVP1_el (8), resize by 50% and add above the mask layer; flip white background. Layers > Rotate/Zoom with these settings:
Open the tube, resize by 65% and add above the frame layer. Duplicate and send one to the bottom of the frame; erase the small area on the right (her pants). Drop shadow the top tube layer only.
Open Collab_VVP2_el (7), flip, resize by 25% and add above the mask layer. Manually position at the top of the frame then duplicate and mirror/flip the layer to position at the bottom right.
Open Collab_VVP1_el (3), resize by 20% and add above the frame layer; position.
Open Collab_VVP1_el (4), mirror and then resize by 25%. Drop shadow, duplicate, mirror and flip then position.
Open Collab_VVP1_el (1), resize by 25%, add above the light pink flowers layer and position.
Open Collab_VVP2_el (2), resize by 15%, mirror and then add above all layers to position.
Re-Position to your liking; Drop Shadow layers, crop or resize to your liking then add your name with copyright. Upload to a photo sharing site to enjoy.
No comments:
Post a Comment