-->
How To Add PDN Layers HERE. I do it the first way every time. PDN/PSP Plugins that I use a lot are located HERE.

Monday, February 13, 2012

HOW TO: Add Paper Behind a Frame (3 ways)

For this tutorial, I will show you three different ways in which you can add paper behind a frame. I will start with the hardest and end with the easiest. Please remember that most frame papers can be added in the same way for each. I am just demonstrating the different ways you can. You choose the one that you like best.

The first way is to have your frame ready and then add paper behind the image, as seen in this first step (frame by Raspberry Road Designs).

Since this frame is thick, version one is to add a paper over the frame (to center it), moving it below the frame layer and using an erase to remove the excess.
After you add a mask, tube, name and copyright, you'll have a design similiar to mine below:
The second way is by using your cropping tool. This is very useful if you have a square or rectangle frame. Add your paper below your frame, making sure it is centered under your frame.

Select the Retangle Select tool from your toolbox. Hide the paper layer that is over your frame but do not leave this layer.
Follow the opening of the frame with your rectangle tool until you get your marching ants (as seen below).
The paper layer will look like this:
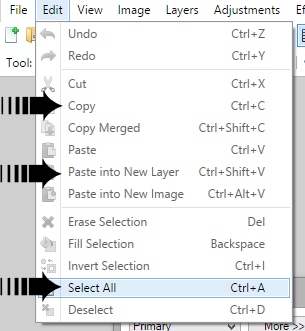
While still on then the paper layer, got to Edit > Invert Selection and now the paper layer looks like this:
Hit delete on your paper layer and move below the frame layer. Now your design may look like this:
The third and final way I learned while trying to follow a tutorial completed in PSP. This way works most of the time, unless there are a lot of openings (which means you must keep duplicating the paper and layer and repeating the process until completed, which is crazy absurd to do).

Again, add your paper over the frame, grab your magic wand and click inside the frame opening. And again, you'll see the marching ants.
Again, go to Edit > Invert Selection > and hit delete while on the the paper layer. Move this below the frame layer. However, as you can see, we are still missing two places so you must repeat the process until they are filled.

Now you should have a design that looks like this:
Choose which way is easiest for you and practice. You'll never go back when you can do it the easiest way!

HOW TO: Make a Frame Out of an Element

Today, I will show you how to use an element to create a frame using Mura Meister's Copies. It is really simple to do and can have a wonderful effect from a kit that carries no frame!

I am using a beautiful kit by Just Saskia called "Sweet Tones", which you can find here. While you're there, have a peek around. She has lovely mini kits that you can mix and match to create designs.

To create my design, I want to have a wider canvas and so I create one at 1000x1000. When my frame is complete, I can resize it to my liking.

Open element 04 (multi-coloured flower) and resize by 30%. Add it to your canvas. Open element 02 (brown flower) and resize by 30% and add it below your last flower. Flip white background.


Once positioned (mine is above), we will want to lightly drop shadow and then merge these two flowers together. I used a drop of -2 / 2 / 0 / 6 / 30.


After merging, move layer to middle of canvas and flip white background. Effects > 8bf Filter > Mura's Meister > Copies.


From the drop down menu at the bottom, scan down until you find "encircle".

From the drop down menu on the right, choose circle and either "behind" or "normal" for your circle (mine is normal). I changed no other settings.
Your frame will be off to the left (perhaps) so remove the addition frames and then Effects > Object Align > Center Both to center it. Then, resize to your liking. (Mine is by 50%)

Now is the time that I save in *psd form. Then, I find and add my tube, mask and any other elements that you wish from the kit. Upload to Photobucket and enjoy.

Sunday, February 12, 2012

HOW TO: Pop Out A Tube From A Frame

To demostrate how to make a tube look as if it is popping out of a frame, I am using a cluster frame and papers by Kimerick Kreations.

This is how far I am along witht his design:
And this is what my layers box looks like as well:
As you can see. I have one tube layer above, and one tube layer below, the cluster frame layer and the paper layer is below all new layers but above the white background.

While on the paper background, use your magic wand, click the layer and then go to the lower tube layer and hit delete on your keyboard. Now the layers box looks like this:

Drop shadow the upper tube layer now. Using an eraser on 75% hardness,  slowly remove the lower half of the tube  and slowly work your way up to the frame edge. Be mindful of where the drop shadow will fall inside of the frame so that you do not erase too much of the tube.

The layers box will look like this:
Crop as close as you can to the design's drop shadow and then resize your design. Add your name and copyright then upload to enjoy.

HOW TO: Use A Cluster Frame

Cluster frames are frames that have all of the elements in place, with or withoout drop shadows added. Basically, you'll have to do is add a mask, a tube, some text and a copyright for any tube used. Here's a tutorial on how to use them.

Open your program, find your paper you wish to use and add your mask to your paper.

This is mine:

I opened a layer of paper, resized it so I could utilize my mask and then add it to your canvas. (I have reversed the colour of my background so you can see my lighter background.)

Now, open your frame, re-size if needed and do the following:
Return to your mask layer and do the following:
Now, you mask layer should look like this:
Add your tube and center frame paper, drop shadow all layers to your liking (except the mask layer). Once the designing part is complete, you'll need to add your name (with outline and drop shadow) and then any copyright for the tube you have used.

This is what I came up with:
I ALWAYS delete my white layer before saving as a PNG image (and always save in a *psd when creating it). Deleting the white layer leaves a transparent background layer so that ALL colour will come through. This makes it easier to see the background colour of your boxes on your social media posts.

Saving in PNG makes you image SUPER clear.

HOW TO: Delete Layer "Addition" Lines

On my example below, I have added a mask to my paper and added the paper to my canvas. Clearly, you can see the "addition" lines all around the new layer.
If you were to add a drop shadow now, it would be cut off slightly, due to the frames around the layer. You may still want to delete the frames when continuing your design at some point, just to get your footing with your creativity. Here's how to do this:

Go to Edit > Deselect:
Now, as you can see, the frames are gone! Easy! I love it!

HOW TO: Add An Element To Your Project (2 ways)

Create a canvas size you can work with and that matches the size of your elements. Mine is 800x800, since my elements are tagger sized. (Mine is cropped close for better viewing.)
Open an element from the kit you are using and: Edit > Select All > Edit > Copy and then add to the canvas. Then, go to the canvas and: Edit > Paste into New Layer to add the element to the design.

You'll see addition lines (also called "frames") around the new layer. Simply Edit > Deselect and they'll be gone.
Now you can move the element either by (1) manually moving into position or (2) using object align to position to your liking.

After every layer added, always remove the frames before any movement with Object Align OR Drop Shadow. This ensures all of the element is moved OR that the drop shadow is even and not cut off.

At this point, name your design and save as a .psd extension then continue until the design is completed.

Here's what I came up with:

I check the white background of my design to remove it (for a clear background that works with all colour backgrounds) and then Image > Flatten to merge it into one layer. Then, save the design in .PNG to ensure a sharper image for viewing.

When using tubes, ALWAYS credit the designer who created the tube, with a current URL, when crediting the designer.

Way #2:

If the elements you are using are smaller than the canvas you've created, you can simply add them by doing the following:
At this time, a box will pop up. Use it to find the kit/elements you wish to add to the canvas and click open.

Once added, deselect the addition frames and position. I've added two elements (from above) and positioned them after removing the addition frames.

I then cropped and came up with this:
This is how I made th same screen shot look like one!

Saturday, February 11, 2012

HOW TO: Extend A Taggers Template

Have you ever downloaded a tenplate to use and foudn there simply wasn't enough space to create your design with? There is an easy and simple way to extend out your template so that you can have room to create.

This template by Gimpstastic Scraps will be my example. As you can see, there is hardly any white space around the template to create with; the size is 470 x 456.
Highlight the white background in your layers box. On the upper toolbar: Image > Canvas Size > and a new box will pop up.
It shows you what size your template currently is and, if you change the settings, what the size will be once you make changes. I figured I'd add an extra 100 pixels, to be distributed evenly around the white background, would do me good.

Remember, we are only extending the template outward. If you move the anchor from "middle", it will add your pixels to whatever side you decide (but will make our template look wonky).

Here's what our template look likes now. I've add a black background where the template was extended so that you can see the change (yours should be white like the rest of the white background).
Save this template under the original file name and you have an extended template to use for future use.